Creating a JWT secured react app and Kotlin server (part 2)

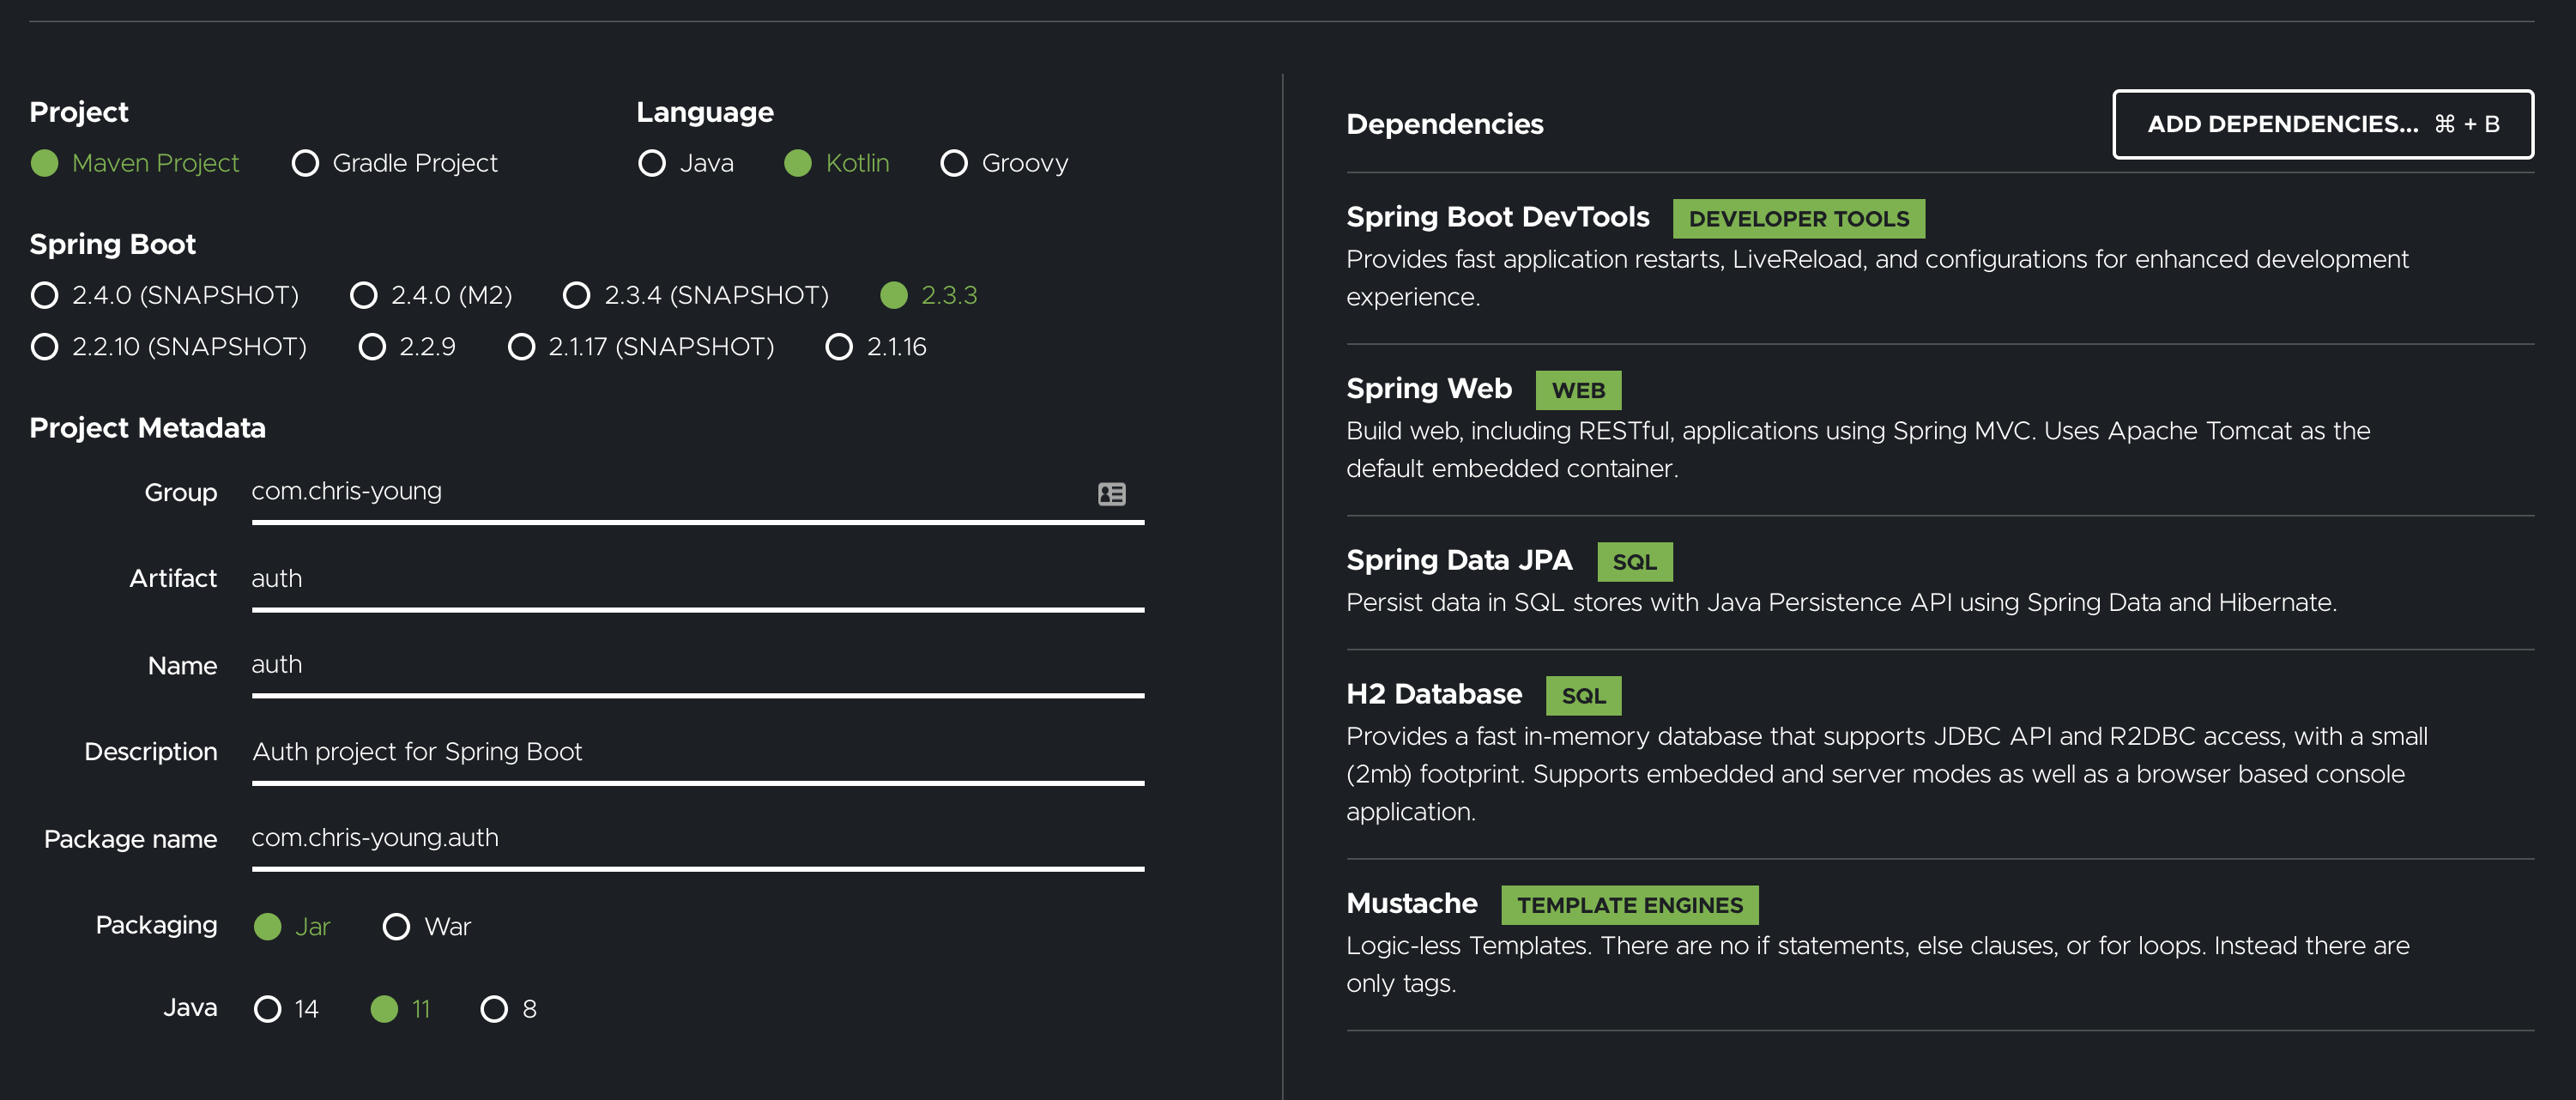
Time for some code at last! If you haven’t read my last post, please head on back here.

I’m starting things off with a very simple controller that returns HTML responses.

package com.chrisyoung.auth

import org.springframework.http.MediaType
import org.springframework.stereotype.Controller
import org.springframework.ui.Model
import org.springframework.ui.set
import org.springframework.web.bind.annotation.GetMapping
import org.springframework.web.bind.annotation.PostMapping
import org.springframework.web.bind.annotation.RequestBody
import org.springframework.web.bind.annotation.RequestParam


@Controller
class LoginController {
    @GetMapping("/login")
    fun loginForm(model: Model): String {
        model["title"] = "Login"
        return "login"
    }
    @PostMapping("/login", consumes = [MediaType.APPLICATION_FORM_URLENCODED_VALUE])
    fun login(
            model: Model,
            @RequestParam(name = "username") username: String,
            @RequestParam(name = "password") password: String
    ): String {
        model["title"] = "Login"
        model["username"] = username;
        model["password"] = password;
        return "loggedin"
    }
}

Annotations are extremely powerful in Spring Boot. The @Controller, @GetMapping and @PostMapping annotations are taking care of the routing and request and response handling for us. I admit that they do seem a little bit too magical, but I’ve always enjoyed a bit of magic over a bunch of boilerplate.

in the functions we can see the beautiful strictly typed parameters, including the special parameter “Model” used by the mustache templates below

The application is very simple at this point. The /login route displays a html form with fields for username and password, and when that is submitted, those values are pulled out of the form-encoded request into String-type function parameters which are just displayed on the next page. I’m not actually implementing any login logic here, just request logic. I haven’t started with REST endpoints yet, because I need a couple of actual HTML pages in my auth service for the initial login and the authorisation page.

I also need a couple of templates named to match the return values of the GET and POST mapping above

{{>_header}}
    <h1>Login</h1>
    <form method="POST" action="/login">
        username:
        <input type="text" name="username"/>
        <br />
        password:
        <input type="password" name="password"/>
        <br />
        <input type="submit" title="login"/>
    </form>
{{>_footer}}

/resources/templates/login.mustache

{{>_header}}
<h1>Logged in</h1>
<p>username {{username}}</p>
<p>password {{password}}</p>
{{>_footer}}

/resources/templates/loggedin.mustache

Next I’ll add a bit of logic to make it a bit more functional
Continue Reading…

Creating a JWT secured react app and Kotlin server (part 1)

‘ve been a PHP software developer for as long as I’ve been developing software. My first taste of programming in university was in PHP, and whilst I’ve developed in Java and Javascript at different points in my career – I do a fair bit of javascript at the moment actually – I’ve always come back to PHP. So since change is like a holiday, I wanted to take some time to learn some new things that are rising in popularity. Furthermore as I journey into the micro-services space, I’m dealing daily with Javascript Web Tokens (or JWTs) to authenticate and authorise requests in my PHP services, and I’m also dealing with their creation.

For this project I wanted to capture the handing of authentication and authorisation by building an auth server, a resource server, and a frontend. The SPA frontend will have a landing page, a login function which will redirect to the authorise page on the auth server, which in turn will redirect back to the frontend with a one time code. The frontend will then fetch an auth token (JWT) using the one time code and client credentials. Finally the frontend will request resources from the resource server using the auth token.

For my two backends I wanted to try something completely new. I hadn’t written anything in Java for a very long time, and I’ve heard very good things about Kotlin since it’s introduction. Kotlin is a superset of Java, adding features many consider to be sorely needed such as strict typing and null handling. I’ve seen it used in Android and desktop applications, but also in APIs. I’ll write both my backend APIs (the auth server and the resource server) in Kotlin with the Spring framework, which appears to be the most popular.

Kotlin Programming Language

Whilst it would be possible to write my frontend in Kotlin also, I wanted to explore a more popular web application framework, React. I’ve used react, and React Native a fair bit recently, however developers with a front-end focus have spent more time than I on those projects. I also used Redux heavily last time, and I’d rather try to avoid that by using React hooks instead. I’ll write my react app in Typescript, since I highlighted that strict typing was one of the reasons for choosing Kotlin above.

Getting started

Source control

Where am I going to put this code that I’m writing? In a git repo of course! And I prefer github.com for its ease of use and many features. I toyed with the idea of keeping all three parts in the one repository, given that they’re part of one (fairly limited) project, but the way that tools like travis and coveralls work, each thing really needs it’s own repository. Good thing they’re unlimited!

Initialisation

As a PHP developer, I’m accustomed to using composer to spin up a project, and in a similar way using npm or yarn to initiate a javascript project. This project starts a little differently. Since I’m using Spring Framework, the recommended way to proceed is to download a zip file with your starter project inside. Alright, let’s do that!. I went to https://start.spring.io/ to build a starter package. (First I did some language tutorials at https://kotlinlang.org/, but I’ll let you imagine that part).

Spring boot initialiser

Spring boot initialiser


I stuck the unzipped files in a folder called auth inside my project folder.

Java Versions

My mac comes with Java 8 / 1.8. That’s not good enough for this project, so I needed to get homebrew to download and install Java 11.

brew tap homebrew/cask-versions

brew cask install java11

Starting the react project was a bit more of a familiar project. I was accustomed to having the latest react-native-cli installed globally with NPM, but now you just run

npx create-react-app frontend

It’s truely a beautiful process, though admittedly the product you get in the end is much lest customised.

Create React App

What IDE am I going to use?

A few years ago I got really attached to Jetbrains PHPstorm for php development. The full featured IDE was everything i needed for debugging testing and writing quality code. Of late working on both PHP and Javascript projects I had taken to using vscode for everything. The PHP plugins provided me most of the IDE-type functionality I desired, and the javascript functionality was out-of-this-world. Since I’ll use vscode for the frontend, I assumed that I could continue to use vscode for Kotlin development too, and certainly there was a fair bit of Java and Kotlin support in the community and in the plugin repo, but ultimately I found it unworkable and decided to switch back to Jetbrains IntelliJ IDEA which, thankfully, is free (that is, the community edition is all I need for this project).

I’m very impressed with the experience of IntelliJ IDEA. Especially given how foreign the Java ecosystem is to me at this point. Managing build, dependencies and run is a lifesaver.

IntelliJ IDEA

IntelliJ IDEA

Of course things weren’t perfect at first – until this popup appeared to save the day

Non-managed pom.xml file found

Adding it meant that the IDE installed all the dependencies for me, and could auto-import.

Screen Shot 2020-08-30 at 2.17.32 pm

Next, I’ll write some actual code. Go to part 2

Laravel generates a system fast

Today I showed off a task management and time tracking system I’ve been working on this week. The system isn’t unique or marketable, but simply meets the organisations needs without incurring a monthly fee – as so many systems do nowadays.
Not only did my co-workers and managers think it was a great system, they also were astounded at how quickly I’d produced a fully functioning system. The answer is with Laravel, generators and Twitter Bootstrap.

Laravel

There are so many good frameworks out there today that nobody should ever code anything in straight PHP. When you use a framework, you have access to code libraries that take care of the basic functions of a web application – routing, security, authentication, database abstraction and more – for you, better than you would handle them yourself. I’ve found Laravel to be an exceptionally easy framework to use.

My application didn’t need to focus on authenticating users, writing SQL statements, dealing with URLs and fighting cross-site scripting and SQL injection. I just got on with the business logic of my application.

http://laravel.com/

Generators

Whilst Laravel itself does not come with particularly powerful code generation – perhaps that’s not in the scope of a framework – Jeffrey Way has developed an outstanding set of generators for the Artisan command line interface. These generators help you develop anything from a simple database migration to a model to a whole set of code to support an object. Say I have an application to manage pets. Generate a pet scaffold with the generators and you’ve got a database migration, a model, a controller and a set of views. Everything you need to get started developing and avoid time-wasting boilerplate writing.

Knowing the objects I needed to work with, I simply generated all the scaffolds and then got to work coding the specifics.

https://github.com/JeffreyWay/Laravel-4-Generators

Twitter Bootstrap

I am not a designer. I don’t want to spend my time designing. I used to create really ugly admin panels. Not any more. Twitter Bootstrap allows you to create a beautiful user interface without trying. Just include the CSS and JS files in your source, and use the CSS classes to style your application. It even comes with an awesome icon font to give you lovely buttons instead of ugly links for your actions.

http://getbootstrap.com/

With these three tools, I could develop an application extremely fast, yet develop code that won’t have the next developer hunting me down for revenge.


Adding a Boolean Toggle to a grid in Joomla admin

Joomla has a fantastic tutorial on MVC components on it’s website, but it seems to stop way short of explaining how to make a fully featured admin panel.

One of the features it doesn’t seem to explain well is how to add those little green ticks and red circles that you can click and it changes (toggles) from one to the other.

Joomla Demo - Administration - Google Chrome_2013-04-30_16-55-57

I like to use it for chosing if an item will appear on the front page or not – but I’m sure you could think of other uses for it. Joomla also has a built in ‘Published’ button which is a bit simpler, so I’ll start from that and move on up. Continue Reading…