Your Go-To Guide for Mastering Dexscreener and DEX Scanning

Your Go-To Guide for Mastering Dexscreener and DEX Scanning

Trading in the digital asset realm becomes significantly easier with tools like https://xn--dexscreenr-76a.com. In this article, we’ll explore how Dexscreener can enhance your trading experience.

What is Dexscreener?

Dexscreener is a real-time decentralized exchange (DEX) analytics tool designed for traders who want to capitalize on opportunities within the crypto market. Unlike conventional exchange platforms, Dexscreener allows users to monitor various DEXs simultaneously. This comprehensive tool is particularly useful for those engaged in the DeFi ecosystem, as it aggregates data from multiple sources.

Key Features of Dexscreener

One of the standout features of Dexscreener is its advanced charting capabilities. Traders can access real-time price charts for a variety of tokens, enabling them to analyze trends effectively. Moreover, Dexscreener offers customizable alerts, ensuring that users are notified when certain criteria are met. This feature is invaluable for traders looking to seize market opportunities quickly.

How to Utilize Dexscreener

Using Dexscreener is straightforward. After visiting the website, you can quickly navigate through the available features. Simply select the DEX of your choice and access the live data for trading pairs. The interface is user-friendly, offering tools for both novice and experienced traders. To maximize the potential of Dexscreener, consider setting up alerts for your preferred coins.

Benefits of Using a DEX Scanner

Utilizing a DEX scanner like Dexscreener provides numerous benefits. First, it enhances your ability to make informed trading decisions by visualizing market movements. Second, the ability to track multiple DEXs allows for greater flexibility in trading strategies. Third, by utilizing features like limit orders and alerts, you can automate parts of your trading process, saving time and effort.

Conclusion: Why Choose Dexscreener?

Ultimately, Dexscreener stands out as one of the most effective tools for traders navigating the decentralized landscape. Its comprehensive features ensure that both new and seasoned traders can gain insights quickly. With real-time data, customizable alerts, and intuitive design, Dexscreener offers a powerful solution for optimizing your trading activities.

How to Download Dexscreener for Enhanced Experience

To further enhance your trading experience, consider downloading the Dexscreener app. The convenience of mobile access means you can stay updated on the go. While navigating the app, you’ll find the same robust features available on the web version. This ensures you never miss out on essential trading opportunities.

Feature Dexscreener Other DEX Scanners
Real-Time Data Yes Limited
User-Friendly Interface Yes Varies
Custom Alerts Available Not Always
Wide DEX Compatibility Yes Limited
Mobile App Availability Yes Rare

Dexscreener Guide: Smart Dex Scanner Strategies 2026

Dexscreener Guide: Smart Dex Scanner Strategies 2026

The gateway to comprehensive on-chain DEX analytics is simple to access; try dexscreen for a focused look at real-time activity across chains and pairs. This single tool can change how you filter opportunities, but it takes practice. Read on for a hands-on walkthrough that covers setup, interpretation, and real scenarios where dexscreener and dex scanner techniques matter.

How dexscreener Works: Architecture and Core Features

At its core, dexscreener aggregates on-chain trade data from many decentralized exchanges and presents it in consolidated lists, charts, and alerts. The platform pulls swap events, liquidity pool changes, and token lists, then normalizes them so traders can compare apples to apples. You get access to recent trades, price impact, liquidity, and pair flows without having to query multiple explorer pages. That makes it fast when a new token starts moving and speed matters.

Many people treat dexscreener as a simple ticker. In reality it is a dex scanner – a live filterable view into trades and liquidity on multiple chains. When you open it, the interface highlights the newest pairs first, shows volume spikes, and displays price charts. For active traders this reduces time spent hunting and increases time spent analyzing.

Why does the architecture matter? Because latency and reliability determine whether you catch a move or only see it after it is finished. Dexscreener maintains lightweight data pipelines that focus on near real-time indexing, and the UI is optimized to render many tickers at once. You will notice fewer slowdowns during peak periods compared to ad-hoc manual checks.

dex screener download and setup: getting started step by step

Downloading or bookmarking the right interface is the first step. Many users search for dex screener download options to get desktop access, mobile-friendly pages, or browser extensions that streamline alerts. While there may be multiple ways to access the service, the essential setup is straightforward: choose your chains, set base tokens to watch (for example ETH, BNB, or stablecoins), and enable alerts for volume or liquidity thresholds.

Step-by-step tips that help during setup:

  • Start with one or two chains you trade on – complexity grows fast.
  • Set conservative alert thresholds first, then tighten them as you get comfortable.
  • Use watchlists to follow projects rather than single pairs, it saves time.
  • Keep a small list of trusted pairs to avoid noise from low-liquidity launches.

Remember, downloading third-party tools that claim to integrate with dexscreener may carry risk. Always verify sources and avoid sharing private keys or sensitive credentials. You can leverage browser bookmarks and the official site to maintain a clean workflow without unnecessary risk.

Data, filters and alerts: tailoring the dex scanner to your strategy

Filters are where dexscreener shines. Use them to cut through noise: filter by volume, liquidity, price change, or time since pair creation. A trader looking for quick flips will prioritize recent pairs with sudden volume spikes and low initial liquidity. A longer-term observer might monitor liquidity growth and consistent buy pressure over hours or days. The dex scanner lets you apply these lenses quickly.

Useful filter combinations to try:

  • Volume spike + new pair age less than 24 hours – for early discovery.
  • Large liquidity injection + price consolidation – potential long-term candidate.
  • High sell pressure + falling liquidity – risk management signal.

Alerts are critical. You can set push, email, or web notifications for the exact conditions you care about. A very practical workflow: set conservative alerts for a few tokens, then change thresholds dynamically when you see an interesting move. That practice reduces false positives and helps you stay focused.

dex screener: reading charts, liquidity and on-chain indicators

Charts on dexscreener are compact but informative. They show recent price action, depth, and sometimes per-trade annotations. Learn to read the signs: a rapid series of buys with low slippage indicates enthusiastic demand; a single large sell on thin liquidity can cause dramatic price swings. Notice where the liquidity sits relative to market price. If liquidity is shallow on one side, expect high volatility.

On-chain indicators you should track:

  • Recent big trades and their impact on price
  • Liquidity added or removed within the last hour
  • Number of unique wallet interactions with a pair
  • Token age and transfer patterns

Using those indicators together allows a more nuanced read than price action alone. When the dex scanner flags a token, check for abnormal wallet concentration. A token controlled by a few wallets often behaves very differently than one with broad distribution. You’ll catch many scenarios where superficial metrics mislead less thorough traders.

dexscreener review: use cases, limitations and practical advice

A fair dexscreener review must include strengths and limitations. Strengths: speed of discovery, cross-chain visibility, and customizable alerts. Limitations: data noise from negligible pairs, potential for misleading volume on wash-traded pairs, and the risk that early data does not predict longer-term viability. Practically, use dexscreener as a first-pass filter rather than a final arbiter.

Common mistakes traders make and how to avoid them:

  • Chasing every volume spike – focus on context and not just numbers.
  • Ignoring slippage – small liquidity can wipe out expected gains fast.
  • Overrelying on single indicators – combine on-chain signals with external checks.

Personally, I keep a notebook of patterns I see often – sudden liquidity drops, repeated tiny buys, or a pattern of rug-like liquidity withdrawal. Over time these notes made my alert settings more precise and reduced bad entries. A dexscreener review that emphasizes discipline helps more than a feature checklist.

How often should you check the scanner? That depends on your style. Scalpers might watch it constantly during active market windows. Swing traders should set auditable alerts and review chart context later. When a new token appears, do a quick verification: token contract checks, community chatter, and tokenomics. Those steps only take a few minutes but can prevent big mistakes.

There are also integration considerations. Some traders export data or connect dexscreener insights to spreadsheets or external bots. If you automate, implement strict safeguards – a bot that blindly trades every alert will lose money quickly. Treat automation as an assistant, not an autopilot.

Comparison Table: dexscreener vs Common Alternatives

Platform Strengths Notes
Dexscreener Real-time multi-chain scanning, customizable alerts, compact charts Best for fast discovery and initial filtering across many DEXs
DEXTools Detailed on-pair analytics, advanced charting tools Stronger on technical analysis, less focused on cross-chain aggregation
Poocoin Pancake-specific tools, token scanners and charts Good for BSC-specific search; limited multi-chain view
Bloxy / on-chain explorers Raw on-chain data, deep transaction tracing Better for manual forensic checks; slower for live scanning
Token Sniffer / Review Sites Automated contract checks, community-sourced reviews

Advanced Features of Dexscreener for Traders in 2026

Advanced Features of Dexscreener for Traders in 2026

For anyone looking to enhance their trading strategies, the dexscreener platform provides essential insights and advanced features tailored to trader needs. This article delves into the unique qualities of Dexscreener that make it a go-to tool for analyzing decentralized exchanges.

Introduction to Dexscreener

Dexscreener serves as a vital resource for traders seeking to engage with decentralized exchanges (DEXs). By providing real-time data and comprehensive analytics, Dexscreener allows users to make informed trading decisions. It stands out in an increasingly crowded marketplace, offering both novice and experienced traders a robust suite of tools.

Core Features of Dexscreener

At its core, Dexscreener boasts features that can significantly benefit users. These include advanced charting tools, market depth indicators, and various trading pairs. The ability to track price movements, volume, and market cap all under one roof adds to its user appeal.

  • Real-time charting
  • Customizable alerts for price movements
  • Multi-chain support to explore various DEXs
  • Comprehensive asset tracking

User Experience and Interface

User experience is critical in trading software, and Dexscreener does not disappoint. Its interface is designed to be intuitive, allowing traders to seamlessly navigate various functionalities. Clear visuals and efficient layouts ensure that even first-time users can find their way around without hassle.

Benefits of Using a DEX Scanner

A DEX scanner like Dexscreener offers substantial advantages over traditional trading platforms. The real-time data access enables traders to seize opportunities that may arise within volatile markets. Additionally, the ability to analyze multiple DEXs simultaneously aids in discovering the most favorable trading conditions.

Conclusion: Why Choose Dexscreener

In summary, Dexscreener sets itself apart with its advanced features, user-friendly interface, and comprehensive market insights. Whether you are a casual trader or a full-time investor, the tools provided by Dexscreener can enhance your trading strategy significantly.

Comparative Analysis of DEX Scanners

Feature Dexscreener Competitor A
Real-Time Data Yes No
Multi-Chain Support Yes Limited
Custom Alerts Yes No
User Interface Intuitive Complex
Comprehensive Analytics Yes No

Why Traders Prefer Dexscreener for Real-Time Market Analysis

Why Traders Prefer Dexscreener for Real-Time Market Analysis

For anyone interested in exploring digital assets, the dexscreener marketplace offers a comprehensive platform for discovering emerging opportunities.

Understanding Dexscreener’s Unique Features

Dexscreener stands out as a vital tool for traders looking for real-time insights in decentralized markets. Its unique features provide traders with valuable data that enhances decision-making processes. The platform’s user-friendly interface makes it accessible even to beginners, while experienced traders benefit from its advanced analytics capabilities.

Benefits of Using a DEX Scanner

Utilizing a DEX scanner like Dexscreener provides numerous advantages, such as:

  • Real-time data tracking across various decentralized exchanges.
  • Customizable alerts for price changes and trading volume.
  • Advanced charting tools for technical analysis.
  • On-chain data insights for thorough market evaluation.
  • User-friendly interface designed for all skill levels.

How to Access Dexscreener Effectively

Accessing Dexscreener is a straightforward process. Here are some tips to optimize your usage:

First, visit the official website and create an account if necessary. Next, familiarize yourself with the dashboard and the various tools available. Experiment with different chart settings and alerts to see what suits your trading style. Finally, make it a habit to regularly check for updates and new features.

Advanced Trading Strategies with Dexscreener

Once you’ve mastered the basics, you can implement advanced trading strategies using Dexscreener. An effective approach involves utilizing multiple indicators to assess market conditions. For instance, combining volume analysis with price trends can provide a fuller picture of potential trading opportunities.

Comparative Analysis with Other Tools

Compared to other trading tools, Dexscreener offers unique advantages such as:

  • Broader access to various DEXs, making it easier to find the best prices.
  • Customizable features that suit personal trading preferences.
  • Fast and responsive platform, crucial during high volatility.
  • Wider range of supported assets, keeping you ahead in varied markets.
  • Strong community support and resources for users.

Conclusion: The Future of Trading with Dexscreener

As decentralized finance continues to evolve, Dexscreener will likely play a crucial role in how traders navigate these changes. Its innovative features and robust analytics position it as an essential tool for both novice and experienced traders alike. Staying updated with its latest functionalities can truly enhance your trading journey.

Feature Dexscreener Other DEX Scanners
Real-time Data Viewing Yes Limited
On-Chain Data Analysis Comprehensive Basic
Custom Alerts Yes No
Charting Tools Advanced Basic
Mobile Access Available Limited

Why Dexscreener Stands Out in the DEX Scanner Market

Why Dexscreener Stands Out in the DEX Scanner Market

For anyone interested in exploring digital assets, the dexscreener marketplace offers a comprehensive platform for discovering emerging opportunities.

Features of Dexscreener

Dexscreener boasts a variety of effective features that make it an essential tool for traders. One of the most noteworthy aspects is the comprehensive real-time charting capabilities. Traders can visualize price movements and trends directly on their screens.

User Interface Overview

The user interface is designed with simplicity in mind. Even novice traders can easily navigate through the platform. The layout is intuitive, with each feature clearly labeled and accessible. From the homepage to advanced functionalities, everything is user-friendly.

Benefits for Traders

Using Dexscreener provides numerous advantages for traders looking to optimize their strategies. The platform allows for real-time tracking of various decentralized exchanges (DEXs), making it easy to compare prices and find the best trading opportunities.

Comparative Analysis with Other DEX Scanners

When compared to other DEX scanners, Dexscreener outshines in performance and user experience. Many competing platforms lack the same level of detail in analytics. Additionally, Dexscreener features a faster response time, providing traders with timely information that can impact decisions.

Getting Started with Dexscreener

To start using Dexscreener, traders simply need to sign up and create an account. After that, they can customize their dashboard to track specific cryptocurrencies and DEXs. The platform also offers tutorials and guides, which can be handy for beginners.

Additional Tools and Resources

Besides the core features, Dexscreener provides a range of additional tools that can enhance a trader’s experience. Resources like market alerts and transaction histories support informed trading decisions.

Community and Support

Dexscreener benefits from a robust community of users. Traders can share insights and tips, enhancing their knowledge base. Furthermore, customer support is readily available to address user inquiries, which sets it apart from competitors.

The Role of Dexscreener in Crypto Trading

In the rapidly changing world of cryptocurrency, having a reliable dex scanner like Dexscreener is crucial. Its ability to provide up-to-date information ensures that traders have the best chance of capitalizing on market fluctuations.

Why Choose Dexscreener?

Choosing Dexscreener means opting for a platform that prioritizes user experience and comprehensive analytics. Whether you are a seasoned trader or just starting out, Dexscreener has something valuable to offer.

Conclusion

In conclusion, Dexscreener is more than just a dex scanner; it is an essential toolkit for any serious trader. With a blend of user-friendly features, detailed analytics, and a supportive community, it stands out in the crowded market. Finding opportunities in decentralized trading has never been easier.

Platform Key Features User Experience Rating
Dexscreener Real-time charts, trading alerts, DEX comparison 9/10
Uniswap Decentralized trading, liquidity pools 8/10
PancakeSwap Yield farming, staking options 7/10
SushiSwap Cross-chain trading, user governance 6/10
1Inch Aggregation of DEX prices, slippage control 8.5/10

Beyond the Logos Hope

This week I had the opportunity to leave the sh

God’s strength in me

“Thank you for sharing with us today, I really enjoyed listening – you spoke so well” – It’s great to receive compliments like this, but even better still it’s great to see the ways in which God has helped me to grow over the last two years – and one of those is public speaking. When I left home two years ago standing on stage was a painful experience – I would break out in a sweat and stammer over my words, looking at my notes for some sort of help. During my time on board I found myself many times being asked to stand on a stage in a church and tell people about the ship or tell them about what God has done in my life. I won’t lie, this terrified me! But I soon realised that His strength is perfect when my strength is gone, so I said to God that I would do my best but He would have to get me through it, and I managed. Now after so many experiences like this, it has become much easier to trust Him. Last night I was speaking at Erina Community Baptist Church and as it was coming time for me to speak, I felt God challenge me to not just tell people what *I* had done, but to tell them what He    had done through me. So my notes weren’t as helpful and it didn’t sound very practiced, but in the end God gave me the right words to encourage people that God doesn’t call the qualified, he qualifies the called – and also that He will reveal to us the next step at the right time, not sooner.

So after speaking at Erina and also at Green Point Christian College last Wednesday and at Grace Community Church two weeks ago, this completes my thanksgiving speaking tour. Early next year I will be visiting Churches to tell people what God has in store for me next at OMNIvision. I look forward to that.

Image

Creating a JWT secured React app and Kotlin server Part 4: React

In the last blog, I finished off my authentication server in Kotlin. Now it’s time to write a web application to connect to the authentication server to get a token, ultimately to use to consume further content. For this project I’ve chosen to go with React. Introduced by Facebook in 2013, it has steadily gained popularity over the years to the point where it feels like everyone is in React. I’ve had some history with React myself at work, as well as React Native, the bridge to running React on mobile devices natively.

React has a pretty neat way to start a new application called “auth-demo-frontend” over at https://reactjs.org/tutorial/tutorial.html

npx create-react-app auth-demo-frontend

This is going to set you up with all the packages you need and a little sample application that you can modify.

Next we want to install react-router so we can navigate around our application with URLs and bootstrap so we can have a consistent look/feel

yarn add react-router bootstrap

Then we can add a navigation bar to our app.js

And create some components:

import React from 'react';
import useGlobal from "../store";
import queryString from 'query-string';
import { oauthConfig } from '../Config/constants';

function Login(props) {
    const [globalState, globalActions] = useGlobal();
    const params = queryString.parse(props.location.search);
    const { code } = params;
    const { security: { user, state, status, error }} = globalState;
    const { authUrl, clientId } = oauthConfig;
    switch (status) {
        case "authFailure": 
            if (!code) {
              window.location.href = "/login";
            }
            return (
Fail: { error }

) case “authenticated”: return (

Auth’d as: {user.username}

) default: //nothing } if (code) { globalActions.getToken(code, state); return (

Authenticating…

) } else { window.location.href=`${authUrl}?state=${state}&clientId=${clientId}`; return (

Redirecting to your authentication provider

) } } export default Login;

Creating a JWT secured React app and Kotlin server Part 4

In my last post I did the needful and installed code coverage to tell me if my unit tests were testing enough. You might argue that they might not be very good tests, and I’ve never said that coverage reporting addresses quality, but there are now nearly enough tests.

What I should do now is actually provide some proper functionality! The good thing about this, is we’ll be able to test it all properly too!

Database Entities

Now that we’re getting serious, let’s have some more entities. We’ll need to add Client and Code entities in addition to Users.

@Entity
class User(
        var username: String,
        var password: String,
        @Id @GeneratedValue var id: Long? = null)

@Entity
class Client(
        var name: String,
        var secret: String,
        var redirectUrl: String,
        @Id @GeneratedValue var id: Long? = null)

@Entity
class Code(
        var code: String,
        @ManyToOne var client: Client,
        @ManyToOne var user: User,
        @Id @GeneratedValue var id: Long? = null) 

Clients represent the different user interfaces that may seek to authenticate users, and Codes represent the one time codes generated by the Auth service to enable fetching a JWT. Clients should have a fixed redirect URL so that we can be certain we know where we’re sending the one time codes to. The client itself should provide this value as a kind of proof that it is the real deal. I’ve left out obvious properties here like the user’s name and other properties you might add, because our code coverage will report any fields that we’re not actually using as uncovered lines. Neat!

Note the use of @ManyToOne to link to a Code’s Client and User. Amazingly simple.

We’ll also want a couple of smart repositories to hold our queries.


interface UserRepository : CrudRepository<User, Long> {
    fun findByUsername(username: String): User?
}

interface ClientRepository : CrudRepository<Client, Long> {

}

interface CodeRepository: CrudRepository<Code, Long> {
    fun findByCode(code: String): Code?
} 

This is really neat. We’re using the magic methods from spring boot’s database engine to do simple queries, but by defining these interfaces we can specify how the implementation should work. My IDE (Intellij) will tell me if the interface I’m writing doesn’t match the actual implementation. For Clients we’re going to use findById which is a concrete method of CrudRepository so there’s no need for a function definition here. Now that we have these repositories we can inject them as dependencies with zero hassle!

And lastly we’ll add some initial data to our app, since this is all development work. (the database is only in-memory while the app runs!) See how easily we inject the repositories!

@Configuration
class AuthConfiguration {
    @Bean
    fun databaseInitializer(
            userRepository: UserRepository,
            clientRepository: ClientRepository,
            codeRepository: CodeRepository
    ) = ApplicationRunner {
        val user = userRepository.save(User("testuser", "testpassword"))
        val client = clientRepository.save(Client("Website", "secret", "https://localhost:3000/login"))
        codeRepository.save(Code("1234", client, user))
    }
} 

A JWT Service

Next, Let’s create a service to help us generate JWTs

we can use the https://fusionauth.io package to construct a JWT, add claims to it (the user ID and the client ID just now), and sign it with our secret (a little bit of a hack, let’s remember to use a config option for that later!)

        implementation("org.jetbrains.kotlin:kotlin-stdlib-jdk8")
+	implementation("io.fusionauth:fusionauth-jwt:3.5.3")
	developmentOnly("org.springframework.boot:spring-boot-devtools")
package com.chrisyoung.auth

import io.fusionauth.jwt.domain.JWT
import io.fusionauth.jwt.hmac.HMACSigner
import java.time.ZonedDateTime

class JwtService {
    fun createAccessToken(client: Client, user: User): String {
        val secret = "secret"
        val signer = HMACSigner.newSHA256Signer(secret)
        val jwt = JWT()
        jwt.addClaim("clientId", client.id)
        jwt.addClaim("userId", user.id)
        jwt.setIssuedAt(ZonedDateTime.now())
        jwt.setIssuer("auth-demo")
        return JWT.getEncoder().encode(jwt, signer)
    }
} 

Controllers

Now we want some functional controllers so we can go ahead and get that token from the front-end! We’re so close!

We’ll want to fill out the AuthController with the power to actually create those Codes

Our GET method should fetch the client from the database (and handle not-found scenario with an automatic response! Isn’t spring boot awesome!). We’ll add all the relevant information to the page for rendering the HTML (yes this route is traditional HTML rendered server-side)

@Controller
class AuthController(
        private val entityManager: EntityManager,
        private val clientRepository: ClientRepository,
        private val codeRepository: CodeRepository
) {
    private val chars = ('0'..'z').toList().toTypedArray()

    @GetMapping("/authorize")
    fun authorizeForm(
            model: Model,
            request: HttpServletRequest,
            @RequestParam(name = "state") state: String,
            @RequestParam(name = "clientId") clientId: Long
    ): String {
        val client = clientRepository.findById(clientId).orElse(null)
        client ?: return ":notfound"
        request.session.getAttribute("user") as User? ?: return "redirect:/login"
        model["title"] = "Authorize"
        model["clientId"] = clientId
        model["clientName"] = client.name
        model["state"] = state
        return "authorizeForm"
    }

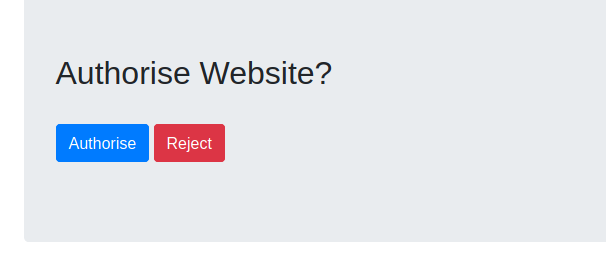
Our form should display all the useful information to the user, and keep the relevant data in the hidden fields for the POST. Clicking the submit button is going to POST the data to the same route and create our secret code!

{{> _header }}
<div class="jumbotron">
    <form method="post" action="/authorize">
        <input type="hidden" name="clientId" value="{{clientId}}"/>
        <input type="hidden" name="state" value="{{state}}">
        <h2>Authorise {{ clientName }}?</h2>
        <br/>
        <input class="btn btn-primary" type="submit" value="Authorise">
        <button class="btn btn-danger" type="button" onclick="history.back()">Reject</button>
    </form>
</div>
{{> _footer }}

Our POST method should again fetch the client from the database, get the current user from the session, and create a new Code entity record before redirecting to the frontend with the string version of the Code.

    @PostMapping("/authorize")
    fun authorize(
            model: Model,
            request: HttpServletRequest,
            @RequestParam(name = "state") state: String,
            @RequestParam(name = "clientId") clientId: Long
    ): String {
        val client: Client? = clientRepository.findById(clientId).orElse(null)
        client ?: return "notfound:"
        val user = request.session.getAttribute("user") as User? ?: return "redirect:/login"
        val secret = (1..32).map { chars.random() }.joinToString("")
        val code = codeRepository.save(Code(secret, client, user))

        model["title"] = "Authorized"
        model["redirectUrl"] = format("%s?state=%s&code=%s", client.redirectUrl, state, code.code)
        return "authorize"
    }

The most significant parts here are the generation of the unique code (and saving to the database) and the creation of the redirect URL (if all goes well above) from the URL stored on the client record, the state value (a value provided by the client application at runtime representing the unique state at request time, which should be compared when receiving the code to prove the client application can trust the redirect request), and the one time code itself.

The rendered HTML just contains a javascript redirect to the url provided from the controller, and perhaps a nice UI to display while the user waits. You can tell I’m a back-end engineer as I’ve not bothered making it look nice.

{{> _header }}
Redirecting
<script type="text/javascript">
    window.location.href=decodeURI("{{redirectUrl}}")
</script>
{{> _footer }} 

And here’s some concise tests for the authorize form:

@SpringBootTest(webEnvironment = SpringBootTest.WebEnvironment.RANDOM_PORT)
class AuthControllerTests(@Autowired val restTemplate: TestRestTemplate) {
    @Test
    fun `Assert that the form is displayed`() {
        val entity = restTemplate.getForEntity<String>("/authorize?state=1234&clientId=2")
        assertThat(entity.statusCode).isEqualTo(HttpStatus.OK)
    }
    @Test
    fun `Assert that the redirect happens if not logged in`() {
        val entity = restTemplate.postForEntity<String>("/authorize?state=1234&clientId=2")
        assertThat(entity.statusCode).isEqualTo(HttpStatus.FOUND)
    }
    @Test
    fun `Assert that wrong clientId fails`() {
        val entity = restTemplate.getForEntity<String>("/authorize?state=1234&clientId=1")
        assertThat(entity.statusCode).isEqualTo(HttpStatus.NOT_FOUND)
    }
    @Test
    fun `Assert that wrong clientId fails POST`() {
        val entity = restTemplate.postForEntity<String>("/authorize?state=1234&clientId=1")
        assertThat(entity.statusCode).isEqualTo(HttpStatus.NOT_FOUND)
    }
    @Test
    fun `Assert that the redirect happens`() {
        val loginResponse = restTemplate.postForEntity<String>("/login?username=testuser&password=testpassword")
        assertThat(loginResponse.statusCode).isEqualTo(HttpStatus.OK)
        val sessionCookie = loginResponse.headers.get("Set-Cookie")?.get(0)?.split(';')?.get(0);
        val headers = HttpHeaders();
        headers.add("Cookie", sessionCookie)
        val entity = HttpEntity<Any>(headers)
        val result = restTemplate.exchange<String>("/authorize?state=5678&clientId=2", HttpMethod.POST, entity)
        assertThat(result.statusCode).isEqualTo(HttpStatus.OK)
    }
}

Of course we should add some more assertions, but this just demonstrates how easy it is to perform the test.

Next, our TokenController will be a rest endpoint that will actually give us the JWT we’ve been waiting for! All the controller will do is fetch the code from the database (or show not found error) and use the JWT service to create a JWT and return a JSON response with the accessToken and (still dummy) refreshToken and the info about the user.


data class TokenRequest(
        val code: String
)

data class TokenResponse(
        val accessToken: String,
        val refreshToken: String,
        val user: User
)

@CrossOrigin(origins = ["http://localhost:3000"])
@RestController
class TokenController(val codeRepository: CodeRepository) {
    @PostMapping("/token")
    fun createToken(@RequestBody(required = true) tokenRequest: TokenRequest): ResponseEntity<Any> {
        val code = codeRepository.findByCode(tokenRequest.code) ?: return  ResponseEntity.notFound().build()
        val token = JwtService().createAccessToken(code.client, code.user)
        return ResponseEntity.ok().body(TokenResponse(token, "refresh-token", code.user))
    }
}

Note the use of the @CrossOrigin annotation to allow browser AJAX requests from different domains (in local development from a port 3000, React’s favourite), and the use of @RestController rather than just @Controller. This does some nice magic around providing a JSON response.

I quite enjoy the easy definition of what a request and a response look like, so that we can strictly type the controller method. A Token Request needs only the one-time code, and a Token Response will only have the JWT (access token), a refresh token, and the user object so we have some info about the user in the response body. We’ll use that later to display a welcome message.

No templates here, it’s a REST controller! Here’s a little test though:

@SpringBootTest(webEnvironment = SpringBootTest.WebEnvironment.RANDOM_PORT)
class TokenControllerTests(@Autowired val restTemplate: TestRestTemplate) {
    @Test
    fun `Get a token successfully`() {
        val headers = HttpHeaders()
        headers.contentType = MediaType.APPLICATION_JSON
        val request = HttpEntity(TokenRequest("1234"), headers)
        val entity = restTemplate.postForEntity<String>("/token", request)
        assertThat(entity.statusCode).isEqualTo(HttpStatus.OK)
    }
    @Test
    fun `Bad code`() {
        val headers = HttpHeaders()
        headers.contentType = MediaType.APPLICATION_JSON
        val request = HttpEntity(TokenRequest("wrong"), headers)
        val entity = restTemplate.postForEntity<String>("/token", request)
        assertThat(entity.statusCode).isEqualTo(HttpStatus.NOT_FOUND)
    }
}

Again only testing the response codes, but roughly I know I haven’t broken the controller entirely.

Let’s also add a Verify endpoint so the client application can check the JWT is (still) valid:

@CrossOrigin(origins = ["http://localhost:3000"])
@RestController
class VerifyController {
    @GetMapping("/verify")
    fun verifiy(
            @RequestHeader(name = "Authorization") auth: String
    ): JWT? {
        val token = auth.replace("Bearer ", "")
        return JwtService().verify(token)
    }
}

I’ll also throw in Twitter Bootstrap for some slightly Nicer styles:

<html>
<head>
    <title>{{ title }}</title>
+    <link rel="stylesheet" href="https://stackpath.bootstrapcdn.com/bootstrap/4.5.2/css/bootstrap.min.css" integrity="sha384-JcKb8q3iqJ61gNV9KGb8thSsNjpSL0n8PARn9HuZOnIxN0hoP+VmmDGMN5t9UJ0Z" crossorigin="anonymous">
</head>
<body> 

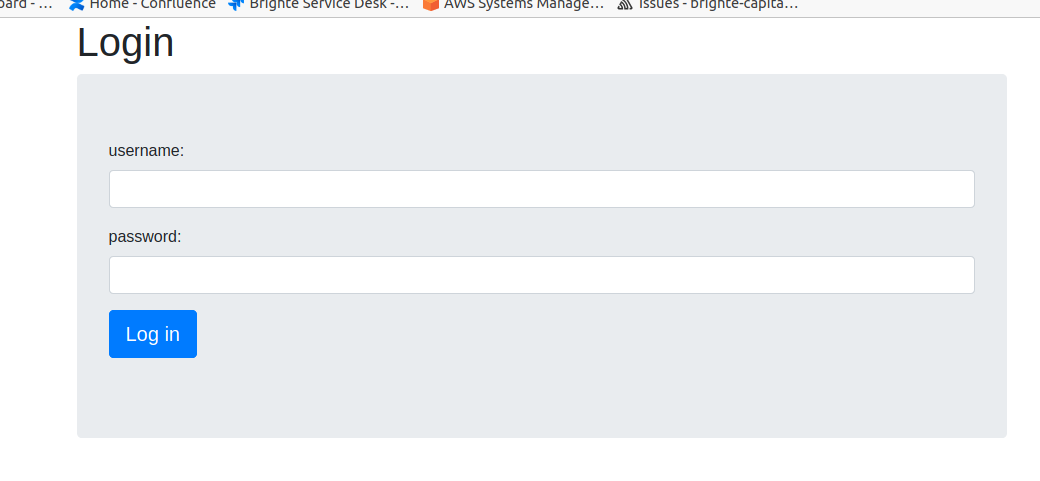
Here’s the login screen:

Screenshot from 2020-10-30 18-07-40

And the Authorize screen:

Screenshot from 2020-10-30 18-09-38

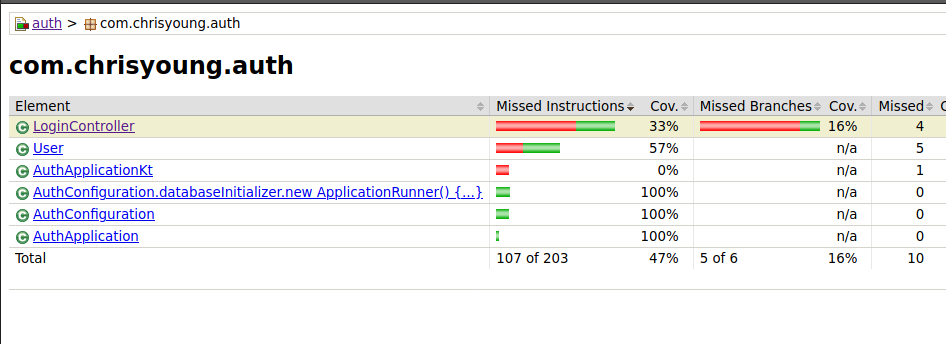
My code coverage is doing alright too

That'll do for now

That’ll do for now

In the next blog, I’ll show you the react app I’ve created to log in using these routes.

Creating a JWT secured react app and Kotlin server (part 3)

Build tools, Unit tests, and Code coverage

The base application I generated from the Spring Boot Initializer was a Maven project. I had the option of Maven or Gradle, and I made a quick choice based on my knowledge at the time. You see, I’m a PHP developer. I’m used to there being one dominant package manager, Composer, and not having to make choices about which one to use. My experience with Gradle and Maven has been that Gradle is for Android projects and Maven for Server-side things. It’s not actually that clear cut, it’s just that Google has chosen Gradle to be the official build tool for Android, and maven is the original package manager so older projects run on maven.

I did experience a little bit of this package manager duality when developing JavaScript applications using either the Node Package Manager, or the stand-in replacement Yarn, developed by Facebook’s React team because npm was too slow, but yarn used the same package.json file as npm, so switching between the two only meant losing your package lock file.

Yarn’s biggest claim to fame is speed, and it seems that is what Gradle brings to the table also. Again, as a PHP developer I’m used to my code being interpreted at runtime, rather than being compiled with every code change, and it hadn’t even entered my mind that build speed would be a factor, but golly was I bored watching my application build over and over again to fix simple mistakes I’d made in my code.

The gradle website presents a very convincing demonstration of how much faster Gradle builds are, and that it actively avoids doing unnecessary work. It sings the praises of it’s “work avoidance mechanism”, and shouldn’t we all? I was sold on the promise of faster builds, and the result didn’t disappoint. Have a look here https://gradle.org/maven-vs-gradle/ if you’re interested in more reliable information.

Converting

I mentioned earlier the conversion from npm to yarn for an existing project was as simple as running `yarn` instead of `npm i`, but it’s not like that for Gradle, it’s a totally different structure. Maven has it’s pom.xml file that looks a bit like this

Maven pom.xml

And Gradle has a syntax that reminds me a bit of json and a bit of yaml. Apparently it’s a superset of Java and it’s called Groovy.

plugins {
    id 'application'
    id 'groovy-base'
}

dependencies {
    implementation project(':utilities')
    testImplementation 'org.codehaus.groovy:groovy-all:2.5.11'
    testImplementation 'org.spockframework:spock-core:1.3-groovy-2.5'
}

application {
    mainClass = 'org.gradle.sample.app.Main'
}

The thing is that now with the introduction of Kotlin, everyone’s moving from Groovy DSL to Kotlin DSL which uses Kotlin syntax. I guess this is better, but what it means is that documentation is completely fragmented between maven XML, and the two different Gradle formats, and if you ever ask someone for help there’s a 66% chance they’ll tell you in some other syntax and you’ll have to covert it.

plugins {
    application
    `groovy-base`
}

dependencies {
    implementation(project(":utilities"))
    testImplementation("org.codehaus.groovy:groovy-all:2.5.11")
    testImplementation("org.spockframework:spock-core:1.3-groovy-2.5")
}

application {
    mainClass.set("org.gradle.sample.app.Main")
}

Apparently if you just run gradle in a maven repo, Gradle will do the coversion for you. Unforunately this creates a Groovey DSL, and all the kotlin docs give you instructions in Kotlin DSL, plus we need different plugins for Gradle, so it was easier in the end to re-generate the base project from the Spring Boot Initializer and copy in the new files. I ended up with this commit and this DSL

import org.jetbrains.kotlin.gradle.tasks.KotlinCompile

plugins {
	id("org.springframework.boot") version "2.3.3.RELEASE"
	id("io.spring.dependency-management") version "1.0.10.RELEASE"
	kotlin("jvm") version "1.3.72"
	kotlin("plugin.spring") version "1.3.72"
	kotlin("plugin.jpa") version "1.3.72"
}

group = "com.chris-young"
version = "0.0.1-SNAPSHOT"
java.sourceCompatibility = JavaVersion.VERSION_11

repositories {
	mavenCentral()
}

dependencies {
	implementation("org.springframework.boot:spring-boot-starter-data-jpa")
	implementation("org.springframework.boot:spring-boot-starter-mustache")
	implementation("org.springframework.boot:spring-boot-starter-web")
	implementation("com.fasterxml.jackson.module:jackson-module-kotlin")
	implementation("org.jetbrains.kotlin:kotlin-reflect")
	implementation("org.jetbrains.kotlin:kotlin-stdlib-jdk8")
	developmentOnly("org.springframework.boot:spring-boot-devtools")
	runtimeOnly("com.h2database:h2")
	testImplementation("org.springframework.boot:spring-boot-starter-test") {
		exclude(group = "org.junit.vintage", module = "junit-vintage-engine")
	}
}

tasks.withType {
	useJUnitPlatform()
}

tasks.withType {
	kotlinOptions {
		freeCompilerArgs = listOf("-Xjsr305=strict")
		jvmTarget = "11"
	}
}

Code coverage

For code coverage I want to use a service called coveralls. I have chosen a Gradle plugin  that will upload reports to that service. To generate those reports we’ll use a Gradle plugin that produces coverage reports from unit tests called Jacoco.

To add the coverage report generator, we simply need to add the plugin here

plugins {
   id("org.springframework.boot") version "2.3.3.RELEASE"
   id("io.spring.dependency-management") version "1.0.10.RELEASE"
   id("java")
   id("jacoco")
   ...
}

The jacoco test report comes out looking like this.

Jacoco test report

Jacoco test report

This HTML report is very handy for local development – Next we need to enable XML report generation for export into coveralls.

tasks {
   jacocoTestReport {
      reports {
         xml.isEnabled = true
      }
   }
}

And then we’ll add the library to export to coveralls. Because this is a public repository, there’s no configuration required.

plugins {
   ...
   id("jacoco")
   id("com.github.kt3k.coveralls") version "2.10.2"
   ...
}

Lastly we’ll add a travis file (.travis.yml) to enable CI builds.

language: java

jdk:
- oraclejdk11

cache:
  directories:
    - $HOME/.gradle/caches/
    - $HOME/.gradle/wrapper/

install:
- ./gradlew assemble

script:
- ./gradlew test build

after_script:
  - ./gradlew jacocoTestReport coveralls

Theoretically all that’s needed is language: java and travis will automatically detect the build.gradle file and use gradle to build and test the  repo, but since we want to use a newer version of Java and Gradle than the ones that ship with travis, and we want to do some specific step at the end, it’s better if we are a bit more specific about all the build steps.

Now when we push to GitHub, Travis CI will run the build script and upload the test reports to Coveralls.

resolvconf
install_jdk
Installing oraclejdk11
0.00s
git.checkout
0.44s$ git clone --depth=50 --branch=main https://github.com/darkbluesun/auth-demo-auth.git darkbluesun/auth-demo-auth
0.01s$ export TERM=dumb
cache.1
Setting up build cache
$ java -Xmx32m -version
openjdk version "11.0.2" 2019-01-15
OpenJDK Runtime Environment 18.9 (build 11.0.2+9)
OpenJDK 64-Bit Server VM 18.9 (build 11.0.2+9, mixed mode)
$ javac -J-Xmx32m -version
javac 11.0.2
install
21.04s$ ./gradlew assemble
25.22s$ ./gradlew test build
> Task :compileKotlin UP-TO-DATE
> Task :compileJava NO-SOURCE
> Task :processResources UP-TO-DATE
> Task :classes UP-TO-DATE
> Task :compileTestKotlin
> Task :compileTestJava NO-SOURCE
> Task :processTestResources NO-SOURCE
> Task :testClasses UP-TO-DATE
> Task :test
2020-09-13 02:10:57.345  INFO 4737 --- [extShutdownHook] j.LocalContainerEntityManagerFactoryBean : Closing JPA EntityManagerFactory for persistence unit 'default'
2020-09-13 02:10:57.345  INFO 4737 --- [extShutdownHook] .SchemaDropperImpl$DelayedDropActionImpl : HHH000477: Starting delayed evictData of schema as part of SessionFactory shut-down'
2020-09-13 02:10:57.356  INFO 4737 --- [extShutdownHook] j.LocalContainerEntityManagerFactoryBean : Closing JPA EntityManagerFactory for persistence unit 'default'
2020-09-13 02:10:57.358  INFO 4737 --- [extShutdownHook] .SchemaDropperImpl$DelayedDropActionImpl : HHH000477: Starting delayed evictData of schema as part of SessionFactory shut-down'
Hibernate: drop table if exists user CASCADE 
Hibernate: drop sequence if exists hibernate_sequence
2020-09-13 02:10:57.587  INFO 4737 --- [extShutdownHook] o.s.s.concurrent.ThreadPoolTaskExecutor  : Shutting down ExecutorService 'applicationTaskExecutor'
2020-09-13 02:10:57.592  INFO 4737 --- [extShutdownHook] com.zaxxer.hikari.HikariDataSource       : HikariPool-1 - Shutdown initiated...
2020-09-13 02:10:57.623  INFO 4737 --- [extShutdownHook] j.LocalContainerEntityManagerFactoryBean : Closing JPA EntityManagerFactory for persistence unit 'default'
2020-09-13 02:10:57.625  INFO 4737 --- [extShutdownHook] .SchemaDropperImpl$DelayedDropActionImpl : HHH000477: Starting delayed evictData of schema as part of SessionFactory shut-down'
2020-09-13 02:10:57.635  INFO 4737 --- [extShutdownHook] com.zaxxer.hikari.HikariDataSource       : HikariPool-1 - Shutdown completed.
2020-09-13 02:10:57.638  INFO 4737 --- [extShutdownHook] o.s.s.concurrent.ThreadPoolTaskExecutor  : Shutting down ExecutorService 'applicationTaskExecutor'
2020-09-13 02:10:57.639  INFO 4737 --- [extShutdownHook] com.zaxxer.hikari.HikariDataSource       : HikariPool-2 - Shutdown initiated...
2020-09-13 02:10:57.645  INFO 4737 --- [extShutdownHook] com.zaxxer.hikari.HikariDataSource       : HikariPool-2 - Shutdown completed.
> Task :bootJar UP-TO-DATE
> Task :inspectClassesForKotlinIC UP-TO-DATE
> Task :jar SKIPPED
> Task :assemble UP-TO-DATE
> Task :check
> Task :build
BUILD SUCCESSFUL in 24s
6 actionable tasks: 2 executed, 4 up-to-date
The command "./gradlew test build" exited with 0.
before_cache.1
0.00s$ rm -f  $HOME/.gradle/caches/modules-2/modules-2.lock
before_cache.2
0.00s$ rm -fr $HOME/.gradle/caches/*/plugin-resolution/
cache.2
store build cache
after_script
11.19s$ ./gradlew jacocoTestReport coveralls
Done. Your build exited with 0.

Once the coverage report is uploaded it looks like this:

Coveralls code coverage

Coveralls code coverage

Here’s the full commit on Github.

Next I’ll add some actual functionality and get that sweet 100% coverage.